
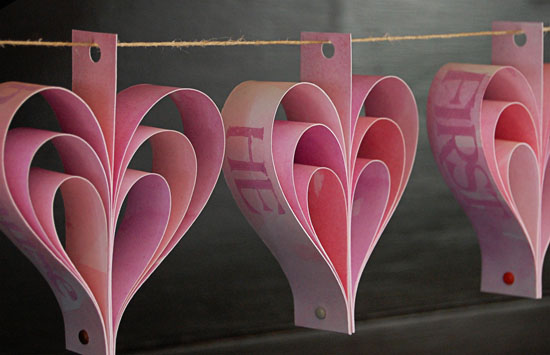
I thought it would be fun to share with you a sweet little heart garland project. Perfect for February. What better time to create a project that reminds us of God’s love. Oh, how He loves us. Through our faults and joys and mistakes and sorrows.
I want the reminder. I need the reminder. No matter what happens in this world… He loves me. I have His consistent love. His love for me has taught me to love. I can love with same beautiful, unconditional love.
We love because He first loved us. 1 John 4:19
The love we receive from God allows us to return that love and to spread that love to others. True love originates in God.
So let’s get started!
First you need paper. Any kind of paper will work. I wanted to use a paper that had color on both sides since you will be able to see both sides when the project is finished. I didn’t have any double sided paper, so I simply made my own.
I used just plain 8 ½” x 11” white card stock and brought out my watercolor paints.

I painted both sides and let them dry overnight. I did weight mine down so the paper would not wrinkle, which it will do a little bit as it dries.

Next, I cut each sheet into 1” strips. That gives me 11 strips from each piece of paper. If you want larger hearts, you can cut longer strips.
Each heart will take 6 strips of paper plus a center strip. Leave 2 strips the full length. Cut 1 ½” from 2 strips and 3” from 2 strips. (For the center strips, I cut some full length strips in half. You will see where this is used a bit later.)

I wanted to put my reminder of God’s love right on the hearts. We love because He first loved us. I added white paint to the watercolor and used vintage letter stamps to stamp out the verse. You can use stamps to do this, letter stickers, or write it with your own handwriting! You can also use ink instead of paint.

Stamp your words on the longest strips.

Now you can lay out each heart. Start with one of your center strips. Put one long strip on either side, then a middle size strip on either side, and then a smaller strip on either side.

Stack them up in this same order. If you made any words, make sure they are facing in towards the center strip. That way when you get to the next step, they will bend to be seen on the outside.

Now, if you want to, you can secure these together. You could staple or clip them together while you do the next step. Or, like I did, have your husband step in and give you an extra hand. I decided to use decorative brads, so I did not staple anything.

I put my brad through, starting with one of the longest strips, then through the middle strip and then the smaller strip.

Next, push the brad through all the strips at the bottom. (If you stapled the bottom in the beginning, I would bring both sides of the heart down and then staple.)

Bring the other strips down and secure the brad.

Now do this process over and over and over for as many hearts as you want on your garland.

Punch a hole in the top of your center strip to hang. I strung my hearts up on a simple piece of twine.


I love to walk by and read the beautiful truth, “We love because He first loved us.”
I hope this simple heart garland will inspire you to create something to remind you of God’s love this February. If you have any questions, be sure to ask in the comments and I will answer them.
By Jennifer, StudioJRU
Leave a Comment

Jennifer it is beautiful, loved it! Thank you for sharing!
And yes, knowing the He loved us allows us to share that love around us…blessings!
Thank you Charina! I love how love works like that! 🙂
Thanks so much for sharing this Amazing
Project <3
You are so welcome… thank you Stacey!
[…] this tutorial on (in)courage today. join us […]
What a great idea, thank you for sharing it with us!
This is great idea, thank you for sharing.
I love this. I’ve been following your blog for awhile through Facebook & really enjoy the posts. I’d love to share some of them on Pinterest but I can never grab an image to pin. Let us know if you decide to make your blog pinnable.
At the bottom of the post, there is a little ‘pin it’ button Jen. If you just click that, a photo and description will come right up for you to pin!
Thanks! I usually copy & past into the pin bar on Pinterest.
Love it, Jennifer.
I woke up this morning thinking I wanted a great, biblical craft for Feb. Wow! Love this. Thank you!
Oh wow… what perfect timing Danelle!
I love it! I just might have to give this a try.
What a feast for the eyes. Ahhhh, beauty. Doesn’t it make everything better? Thank you for this stunning artwork!
Thank you so much Janell! It really is nice to have pretties around! 🙂
This is beautiful. I’m totally going to make this to surprise my kiddos on Valentine’s Day (see, Mommy can make crafts, too!)
Aww… what a sweet surprise Erin! I would love to see it! 🙂
Jennifer, they’re gorgeous! What a great idea! I might have to try and make a few of these with my kids! Thank you for the great tutorial!
Your creative kids would do great making these hearts Anita!
Thank you for a great post & reminder! Yes–we can love everyone, even some who seem unlovable, because He first loved us–Sinners who deserved death, but got Grace & Mercy instead!
Thanks again!
Oh yes, He does remind us that everyone is loveable. Thank you Beth!
LOVE!!! your whole post is heartwarming and wonderful!!
Thank you so much Kelly!
What an awesome blog and cool idea!! You have definitely inspired me to make a heart garland of my own. I have been looking for something fun to make that wasn’t too involved but still looked great, this is it!! What a blessing that we can experience the love of God! That’s somethin to celebrate!!
Yay! I am so happy you are inspired to make one of your own Jacqueline!
lovely Jennifer! might consider doing this with my daughter for her room. Thanks for sharing!
That would be so sweet in a girls room Audry!
Absolutely awesome! Great reminder of Perfect love!
I had left a ribbon strung across the top of one of the windows in my studio when I finally took down the Christmas things, thinking about what I might like to put there. Now I know. ;o) There is something about working with the words, absorbing them through our fingers, through a process, that helps embed them in our being. I admire the simple elegance of your project. Thanks so much for sharing!
I agree about working with words. While stamping this verse, I just kept repeating it to myself. It was a wonderful creating experience! I might put this in my studio too! 🙂
Adorable. I am going to “cheat” and use scrapbook paper! 🙂
If I had double sided scrapbook paper around… I would have used that too Kaitlin! 🙂
Thank you!! Loved it!! Blessings, Barb
Pinned this this morning after reading it in my Google Reader last night. I LOVE it! Going to get supplies and make it this weekend.
So happy to hear you were inspired to make on of your own Kim!!
Beautiful!
Jennifer, Such a great Tutorial! Thank you for sharing with us. Im going to pin it since Ive been wanting a valentine garland for my hearth. I wish I still had my set of letter stamps from when I was homeschooling my oldest three. (its always more fun to stamp your spelling words instead of handwriting them! At least for the creative right brained or kinesthetic learners!)
Thank you so much Anna! Letter stamps are so much fun. You could also use rub on letters! 🙂
Thanks Jennifer! I so cannot come up with this stuff on my own! Thankful for people who think visually.
Oh, this is so beautiful. I hope to do this this week with my daughter. Thank you so much!
What a fun mother-daughter project Jennifer! 🙂
Very nice…what a fun family project that would be!
Very clever — I’ll be trying this one; it really looks fun.
So happy to hear that Dee!! It was a fun project!
Oh, I love this! It would look so cute strung across our fireplace.
This is such a neat idea! Thanks for sharing. Pam
SO adorable Jennifer!!!! I could totally make this part of my year round decor 🙂 I might just do that! Thank youuuuuuuuu <3
xo,
Sherri
Thank you Sherri! I think I am going to put it in my studio year round! 🙂
Wow! Jennifer, that is beautiful…you are so creative! Thanks for the step-by-step…someone craft-challenged like me might even be able to make it 🙂
Thank you so much Dolly! I know you can do it… I hope you give it a try! 🙂
Love this project. Thanks for sharing!
You have helped me get into the spirit of preparing for Valentine’s Day, seems like it is sneaking up on me this year, I just finished putting all my Christmas decor away last week!
I hear you Kathy! It is right around the corner! 🙂
Cute cute cute!! & of course, I love what it has to say, too! <3
I just adore this. You are so incredibly creative!
Girl, you are so talented, so creative!
1 John 4:19 is one of my life-long favorites. My only response to God is “I love you, too.” Because he FIRST loved me. Still trying to let that soak in…25 years after learning this verse.
love and hugs to you,
Linsey
Oh! This is great (and steps so well laid out!) I am loving those vintage letter stamps…I usually don’t decorate much for Valentine’s, but I can see sweet tweener and I doing a few things – and the verse fits so perfectly with the direction we have for Bible Study here at the first of the year…
Blessings, friend!
He first loved us it’s so true. thanks for sharing jennifer its amazing . god bless you .
[…] i made a heart garland tutorial for my (in)courage post this month. it was posted on the site yesterday if you want to take a look… right here. […]
Jennifer, your creativity knows no bounds. I adore this, and I adore you!
This is beautiful!
you explained it so simply
Thanks
I am going to make some
hopefully teach some kids how to make them
and use them to celebrate the most amazing blessing
Jesus’ love for me and all of us.
So happy to have found this cute idea before valentines day!
Wow what a great idea. I’m making this with my Sunday School kids this week!
What a beautiful idea! 🙂
[…] Learn how to make this cute heart garland at In Courage here. […]
[…] to lovely Jennifer for this fabulous heart garland tutorial. Share this:TwitterFacebookLike this:LikeBe the first to like this […]
[…] up to Valentine’s Day I saw this link, and thought that would be cool for in the kids’ room. I was procrastinating pondering […]
Wow, such a cute DIY, reminds me that I need to buy a set of letter stamps 🙂
[…] Here's a pretty heart garland that would be great for V-Day as well. From (In)Courage. […]
Thank you! Thank you! Thank you!
I’m going to make one to my friend’s bachelorette party! I think she’ll love it!~
Thanks for sharing!
xoxo